[라즈베리파이] device driver에서 pull up 스위치 설정하기
라즈베리파이5 성능이 좋은 임베디드 기기로 볼 수 있기 때문에, linux kernel module 방식으로 LED를 토글 형식으로 켰다 끌 수 있는 모듈을 개발해봤다. 스위치의 클릭은 while문 기반이 아니라, 버튼 눌림을 인식하는 인터럽트 요청(IRQ) 방식을 배워 구현했다.
#include <linux/module.h>
#include <linux/init.h>
#include <linux/fs.h>
#include <linux/cdev.h>
#include <linux/uaccess.h>
#include <linux/gpio.h>
#include <linux/interrupt.h>

MODULE_LICENSE("GPL");
MODULE_AUTHOR("blaxsior GNU/Linux");
MODULE_DESCRIPTION("gpio driver => LED / button");

/* device & device classes */
// save device number
static dev_t my_device_num;
// save class
static struct class *my_class;
// save device
static struct cdev my_device;

#define SELF_MODULE_NAME "gpio_driver"
#define SELF_MODULE_CLASS "dummy_class"

#define BTN_NO 585 // 14
#define LED_NO 592 // 21

static int is_light_on = 0;
static int irq_no = -1;
/**
 * @brief toggle led light state
 */
static irqreturn_t button_interrupt(int irq, void *data)
{
  is_light_on = !is_light_on;
  gpio_set_value(LED_NO, is_light_on);
  printk("GPIO Interrupt! LED is now %s\n", is_light_on ? "ON" : "OFF");
  return IRQ_HANDLED;
}

/**
 * @brief read data from buffer
 */
static ssize_t driver_read(struct file *File, char *user_buffer, size_t count, loff_t *offs)
{
  // File: data source
  // user_buffer: data destination
  // count: length of user buffer

  int to_copy, not_copied, delta;
  char tmp[3] = " \n";

  printk("value of led: %d\n", gpio_get_value(LED_NO));
  tmp[0] = gpio_get_value(LED_NO) + '0';
  printk("button state: %d\n", gpio_get_value(BTN_NO));

  /* get amount of data to copy */
  to_copy = min_t(int, count, sizeof(tmp));

  not_copied = copy_to_user(user_buffer, &tmp, to_copy);

  // calculate not copied data delta value
  delta = to_copy - not_copied;

  // return remain length
  return delta;
}

/**
 * @brief write data to buffer
 */
static ssize_t driver_write(struct file *File, const char *user_buffer, size_t count, loff_t *offs)
{
  int to_copy, not_copied, delta;
  char value;
  /* get amount of data to copy */
  to_copy = min_t(int, count, sizeof(value));

  /* copy data to user */
  // cannot use memcopy, instead use copy_to_user
  not_copied = copy_from_user(&value, user_buffer, to_copy);
  /* set led */
  switch (value)
  {
  case '0':
    gpio_set_value(LED_NO, 0);
    is_light_on = 0;
    break;
  case '1':
    gpio_set_value(LED_NO, 1);
    is_light_on = 1;
    break;
  }
  // calculate not copied data delta value
  delta = to_copy - not_copied;

  // return remain length
  return delta;
}

/**
 * @brief called when device file is opened
 */
static int driver_open(struct inode *device_file, struct file *instance)
{
  printk("dev_nr open was called\n");
  return 0;
}

/**
 * @brief called when device file is closed
 */
static int driver_close(struct inode *device_file, struct file *instance)
{
  printk("dev_nr close was called\n");
  return 0;
}

static struct file_operations fops = {
    .owner = THIS_MODULE,
    .open = driver_open,
    .release = driver_close,
    .read = driver_read,
    .write = driver_write};

/**
 * @brief called when module is loaded into kernel
 */
static int __init ModuleInit(void)
{
  printk("Hello, Kernel World!\n"); // cannot printf => no commandline
  // allocate device number (dyn & MAJOR)
  if (alloc_chrdev_region(&my_device_num, 0, 1, SELF_MODULE_NAME) < 0)
  {
    printk("device nr could not allocated\n");
    return -1;
  }
  printk("read_write - device nr. major: %d, minor: %d \n", MAJOR(my_device_num), MINOR(my_device_num));

  /* create device class */
  if ((my_class = class_create(SELF_MODULE_CLASS)) == NULL)
  {
    printk("device class cannot be created\n");
    goto ClassError;
  }

  /* create device file*/
  if (device_create(my_class, NULL, my_device_num, NULL, SELF_MODULE_NAME) == NULL)
  {
    printk("cannot create device file\n");
    goto FileError;
  }

  /* initialize device file */
  cdev_init(&my_device, &fops);

  /* register device to kernel */
  if (cdev_add(&my_device, my_device_num, 1) == -1)
  {
    printk("registering of device to kernel failed!\n");
    goto AddError;
  }
  /* gpio init 21 ( led ) */
  if (gpio_request(LED_NO, "rpi-gpio-21"))
  {
    printk("cannot allocate gpio 21\n");
    goto AddError;
  }

  /* set gpio 21 as output direction */
  if (gpio_direction_output(LED_NO, 0))
  {
    printk("cannot set gpio 21 to output\n");
    goto GPIO21Error;
  }

  /* gpio init 14 (button) */
  if (gpio_request(BTN_NO, "rpi-gpio-14"))
  {
    printk("cannot allocate gpio 14\n");
    goto AddError;
  }

  /* set gpio 14 as input direction */
  if (gpio_direction_input(BTN_NO))
  {
    printk("cannot set gpio 14 to output\n");
    goto GPIO14Error;
  }

  /* request irq for button */
  if ((irq_no = gpio_to_irq(BTN_NO)) < 0)
  {
    printk("cannot request irq for gpio 14\n");
    goto GPIO14Error;
  }

  int result = request_irq(irq_no, button_interrupt,
                           IRQF_TRIGGER_RISING,
                           "button_handler", NULL);

  if (result) // cannot use irq
  {
    printk("cannot use irq for button\n");
    goto GPIO14IRQError;
  }
  // gpio_set_value(BTN_NO, 1);

  return 0;

GPIO14IRQError:
  // free_irq(BTN_NO, NULL);
GPIO14Error:
  gpio_free(BTN_NO);
GPIO21Error:
  gpio_free(LED_NO);
AddError:
  device_destroy(my_class, my_device_num);
FileError:
  class_destroy(my_class);
ClassError:
  unregister_chrdev(my_device_num, SELF_MODULE_NAME);
  return -1;
}

/**
 * @brief called when module is removed from kernel
 */
static void __exit ModuleExit(void)
{
  free_irq(irq_no, NULL);
  // gpio_set_value(BTN_NO, 0);
  gpio_free(BTN_NO);
  gpio_set_value(LED_NO, 0);
  gpio_free(LED_NO);
  cdev_del(&my_device);
  device_destroy(my_class, my_device_num);
  class_destroy(my_class);
  unregister_chrdev_region(my_device_num, 1);
  printk("Bye, Kernel World...\n");
}

module_init(ModuleInit);
module_exit(ModuleExit);
그런데, 스위치를 누르지 않아도 LED가 스스로 점멸하는 현상이 발생했다. 스위치를 닫힐 때마다 LED가 on 또는 off 상태를 유지해야 하는데, 의도와 다르게 스스로 불이 켜졌다 꺼졌다를 반복했다.
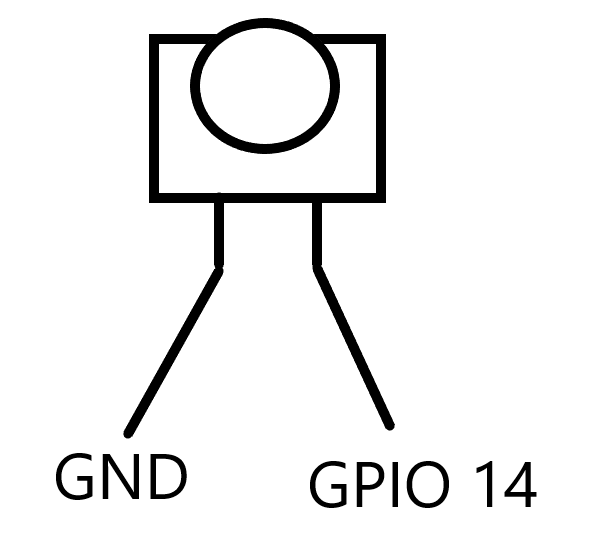
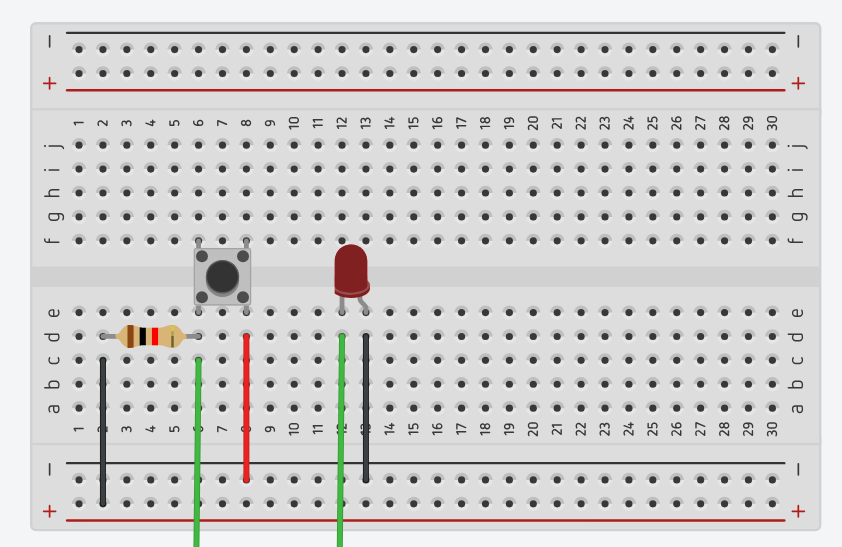
현재 스위치는 다음과 같이 연결되어 있다.
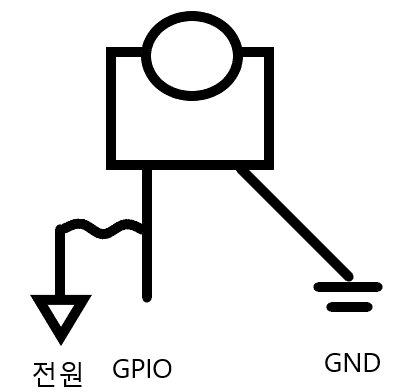
플로팅(floating) 현상
플로팅 현상은 스위치가 열렸을 때 현재 전압의 상태를 알 수 없는 상태를 의미한다.
스위치가 닫힌 상태에서는 GPIO와 GND / Vcc(전원)이 연결되지 않는다. 이 상황에서 GPIO가 Low = 0V 상태에 있다고 생각하기 쉽지만, 전류가 흐르지 않아 명확한 전압을 가지지 않으므로 GPIO에서 측정된 값은 주변 간섭, 외부 노이즈에 영향을 받는다. 위 LED의 점멸 현상 역시 플로팅에 의한 것이다.
해결 방법
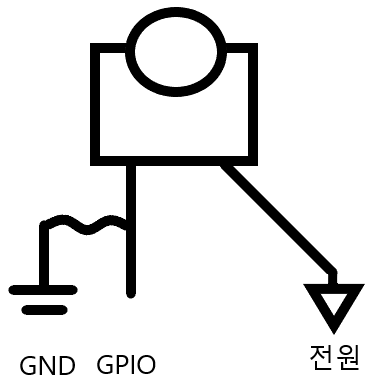
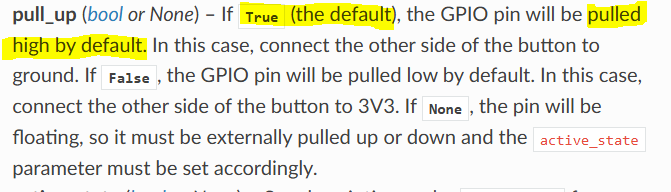
이 문제를 어떻게 해결할 수 있을까? 스위치가 열린 상태에서 입력 핀이 고정된 상태를 가질 수 있도록 회로를 연결하면 된다. 스위치가 열렸을 때의 기본 상태를 High(Vcc)로 두는지, Low(GND)로 두는지에 따라 Pull up, Pull down 방식이 있다.
풀업(Pull Up) 저항
풀업 저항은 Vcc(전원)와 입력 핀을 저항으로 연결해 스위치가 열렸을 때 기본 상태를 High로 유지한다. 입력 핀은 스위치가 열린 상태에서 전원과 연결되어 High 값을 가지고, 스위치가 닫힌 상태에서는 GND와 연결되어 Low 값을 가진다.
풀다운(Pull Down) 저항
풀다운 저항은 GND와 입력 핀을 저항으로 연결해 스위치가 열렸을 때의 기본 상태를 Low로 유지한다. 입력 핀은 스위치가 열린 상태에서 GND와 연결되어 Low 값을 가지고, 스위치가 닫힌 상태에서는 전원과 연결되어 High 값을 가진다.
수정
풀업 또는 풀다운 저항 형태로 선을 연결하면 입력 핀은 항상 High 또는 Low 값을 가진다. 풀업 / 풀다운 저항을 붙여 회로를 구성했을 때는 정상적으로 동작했다.
여담
라즈베리파이 5 튜토리얼에서 사용하는 gpiozero 모듈의 스위치는 기본적으로 pullup 저항이 적용되어 있다.
https://gpiozero.readthedocs.io/en/latest/api_input.html#button
정보를 찾아보니, 디바이스 트리를 이용하면 커널 드라이버 개발 시 특정 핀에 pull up 또는 pull down 저항을 지정할 수 있는 것으로 보인다.